Elasticsearch beta
NOTE: This module is currently in beta and the documentation is still being written
This page how you can install and run the Elasticsearch module on your thirty bees store. It only covers the basics of installing Elasticsearch. If you want to know more about how to install or use your Elasticsearch server directly please refer to the comprehensive Elasticsearch documentation.
Compatibility
Module requirements
This module deviates a bit from the basic thirty bees system requirements. The additional requirements are:
- PHP 5.6 or higher instead of PHP 5.5
- PHP cURL extension -- not required for thirty bees, but is needed in this case in order to communicate with the Elasticsearch server
Beta NOTE: For beta 1 and beta 2, make sure you have disabled the CCC JavaScript option. It is not supported by these versions.
Elasticsearch requirements
In order to provide an extremely fast and easy search we stick with the latest versions of Elasticsearch, in order to provide you with all the state-of-the-art search functionality Elasticsearch has to offer.
Therefore, at the moment of writing, you will need a version of Elasticsearch that is:
- Version 5.4 or higher, including 6.0
Anything lower is not supported and will likely not work.
Please double check if your system satisfies these requirements before proceeding.
Installing Elasticsearch
thirty bees cloud (Cloudways)
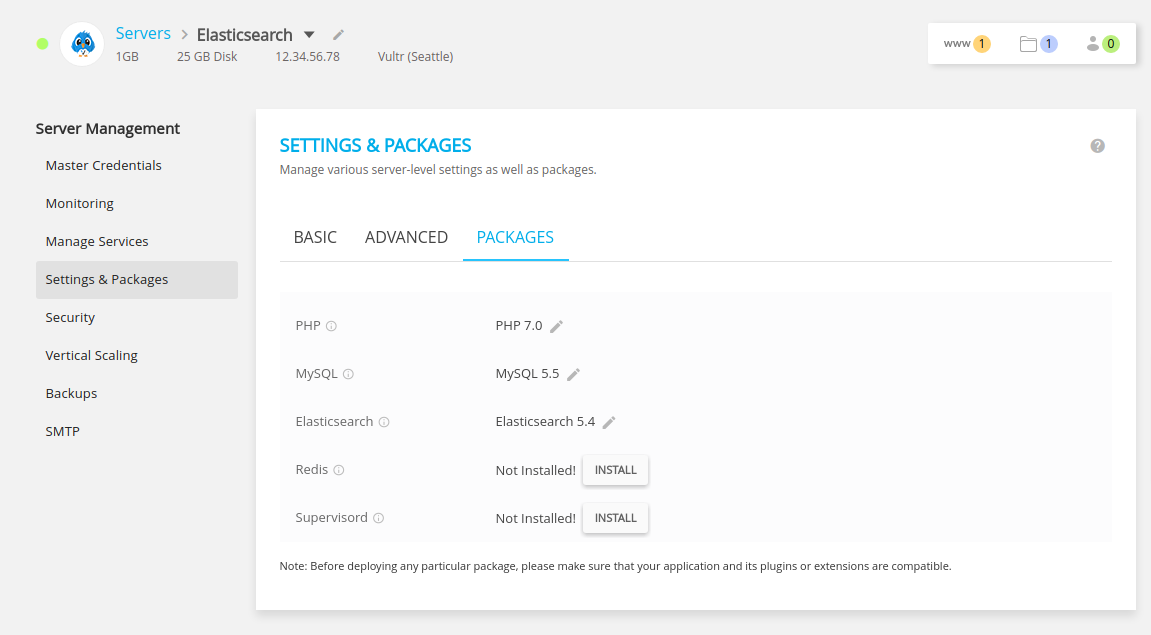
An easy way to use Elasticsearch + thirty bees is by hosting both with Cloudways. If you already have an instance on Cloudways, you can simply navigate to your Cloudways dashboard, select Server mode (top-left) > Server Magement > Settings & Packages > Packages. On this tab you can choose to enable Elasticsearch 5.4.
Plesk + docker
This is a basic configuration example to show you how you can configure your server for Elasticsearch. Elasticsearch is a two-part system. You will need to run an Elasticsearch server (separate Java application) and install the Elasticsearch module in thirty bees.
We will be proxying Elasticsearch via nginx in this example. Basically the module itself connects directly to the Elasticsearch server and the frontend JavaScript widget will connect via the nginx proxy. This ensures that you will get the fastest possible search. To make things easier we will be setting up this server via Docker and Plesk. If you would like to go cli style, you might also be able to follow this documentation, but you will have to figure out the command line alternatives to what Plesk does.
First, start by searching and launching an Elasticsearch docker:
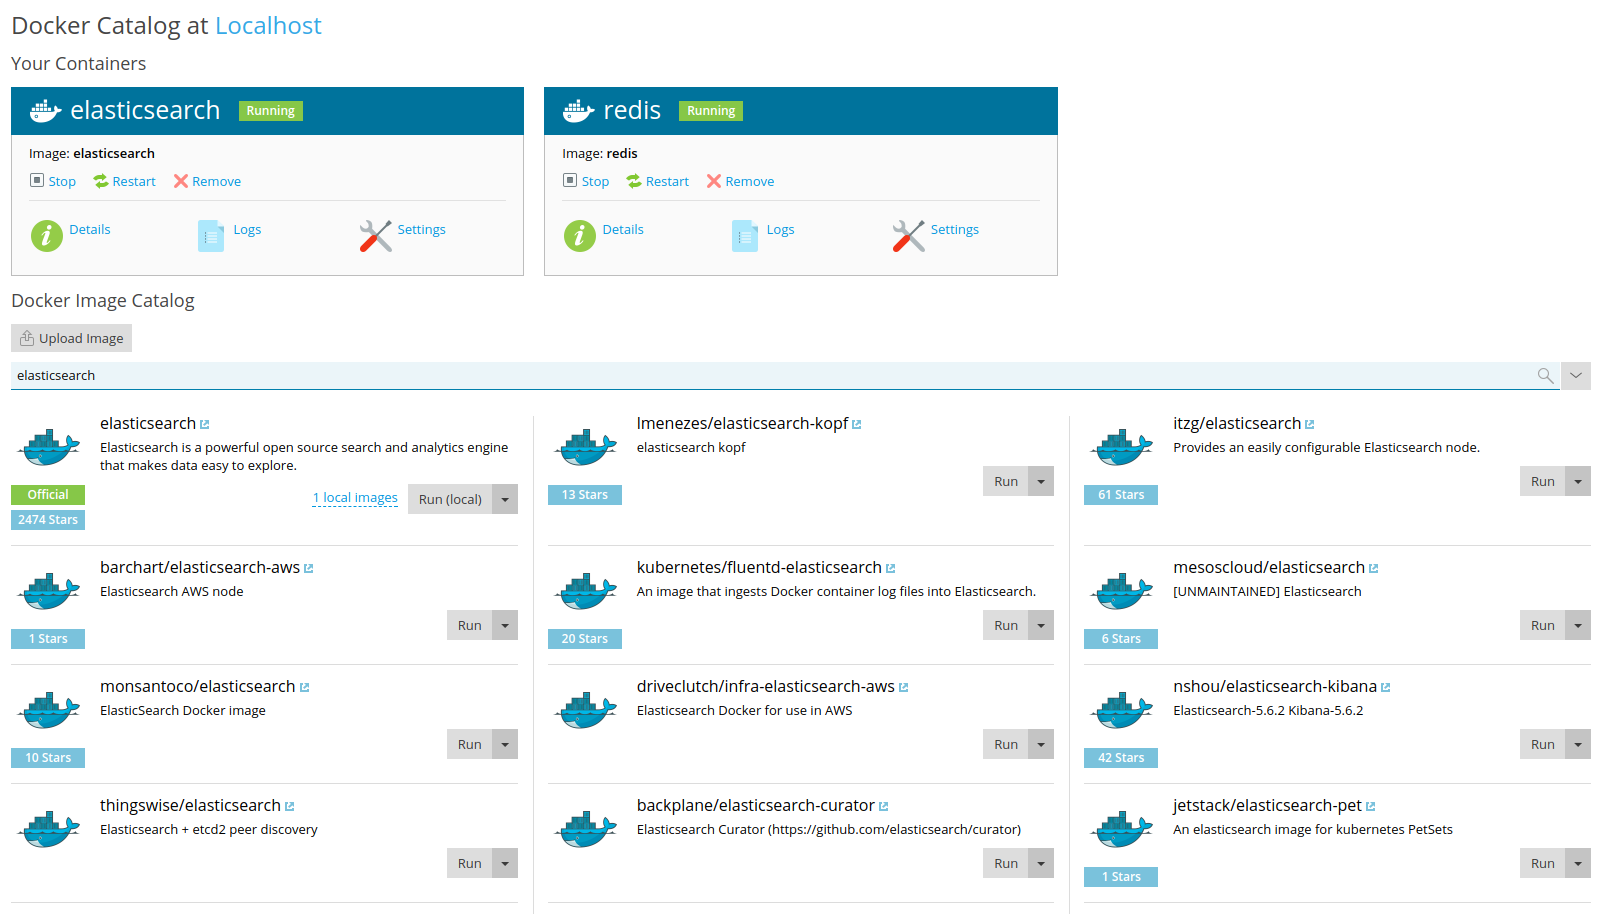
Plesk will make this instance run on a random port number. Remember this number, you will need it later.
Add a search subdomain of your choice via Plesk. Make sure it does not run in proxy mode (Proxy mode unticked). These are the additional nginx directives you will need to secure and expost Elasticsearch:
add_header Access-Control-Allow-Origin * always;
add_header Access-Control-Allow-Methods GET,HEAD,OPTIONS,POST,PUT always;
add_header Access-Control-Allow-Headers Access-Control-Allow-Headers,Origin,Accept,X-Requested-With,Content-Type,Access-Control-Request-Method,Access-Control-Request-Headers,Authorization always;

location ~* ^/thirtybees_\d+_\d+(/_search|/_analyze) {
  limit_except HEAD OPTIONS {
    auth_basic           "Protected Elasticsearch";
    auth_basic_user_file /var/www/vhosts/example.com/elasticread;
  }

  proxy_pass http://localhost:9200;
  proxy_http_version 1.1;
  proxy_set_header Connection "Keep-Alive";
  proxy_set_header Proxy-Connection "Keep-Alive";
}

location ~ / {
  limit_except HEAD OPTIONS {
    auth_basic           "Protected Elasticsearch";
    auth_basic_user_file /var/www/vhosts/example.com/elasticadmins;
  }

  proxy_pass http://localhost:9200;
  proxy_http_version 1.1;
  proxy_set_header Connection "Keep-Alive";
  proxy_set_header Proxy-Connection "Keep-Alive";
}
We have added two .htpasswd files in the directory /var/www/vhosts/example.com. On this page you can create an .htpasswd file.
The first location directive contains the index name, follow by two integers. Those two numbers are respectively the shop ID and language ID. Make sure the name corresponds with your index name, otherwise there will be no access from the frontend.
Save these settings and go!
CLI
We do not provide a tutorial for raw installation since it is basically expert mode and expert generally know what they are doing. To give you a few guidelines, here are your possibilities:
Directly
You can grab a copy from the Elasticsearch download page and run that one directly. It will by default run on port 9200.
Docker
You can grab a docker container directly, we recommend elasticsearch/elasticsearch. More instructions about using Elasticsearch with docker can be found at: https://www.elastic.co/guide/en/elasticsearch/reference/current/docker.html
You can control the ports of this instance and optionally place an nginx proxy in front.
After launching an Elasticsearch instance, feel free to continue with (a part of) the instructions from the Plesk section. It contains an nginx configuration that allows you to expose a read-only URL of the Elasticsearch instance directly, so there is no need for a proxy via your thirty bees instance. In practice this decreases the search delay with 50-200ms per query.
Installing the module
Install the Elasticsearch module and configure the servers. By default the module picks one server located at http://localhost:9200.
This is Elasticsearch's default port and proxied by default so it is ready to be used in the frontend right from the start if you just installed Elasticsearch with the default settings on the same system.
This also works out of the box when you use the cloud version of thirty bees (Cloudways).
After installing the module some conflicting default modules might still be active. They also cause the Elasticsearch module to be displaced from the start.
In order to fix this, disable both the blocksearch and blocklayered modules.
To make the search block show in the previous position, navigate to Modules and Services > Positions and search for the displayTop hook.
Make sure the Elasticsearch module is at the top.
Search facets will be shown on the left and right column. By default thirty bees will add the new blocks at the bottom.
Search for displayLeftColumn & displayRightColumn and reposition the module however you like.
Also make sure you have disabled the default search options on the page "Preferences > Search". They should look like this:
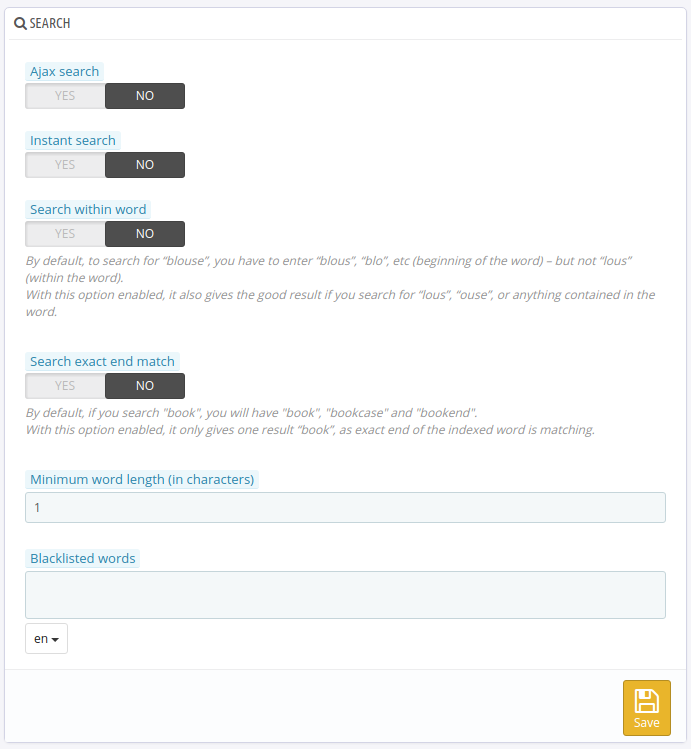
This should be enough to make the module show properly and on the right spot with supported themes.
If your theme is not supported by default or your theme does not take the Elasticsearch module into account you might have to grab one or more of the template (.tpl) and adjust them to your likings.
Upgrading to beta 2 from beta 1
Note that there is no upgrade script to upgrade from beta 1 to beta 2. There is only one way to upgrade from beta 1.
Resets and changing files will not work; you will have to reinstall the module in order to upgrade,
even if you have previously uninstalled and/or removed beta 1 you will need to follow these guidelines:
- Uninstall beta 1
- Upload beta 2 via you back office (not FTP!)
- Install beta 2
- Uninstall beta 2
- And install it again (do not use the reset button)
Configuring the module
After installing the module you should be presented with the module's configuration page that has several options already configured for you by default. In this section we will navigate through every tab and show what you can configure.
Settings tab
On the settings tab you will find generic Elasticsearch settings that do not belong on the other tabs. You generally only touch these if you want to run multiple Elasticsearch instances, optimize them for performance or configure stop words.
Number of shards
The number can be configured right from the module. It will be passed to Elasticsearch when creating the index. It is part of the basic concepts of Elasticsearch. Having an optimum value is vital to providing a fast search experience.
We recommend to never set this number below 2.
Number of replicas
Like the number of shards, this can be changed right from the module as well and will be updated when creating the new index. Optimize this number for the best experience.
Due to the faceted search this module provides (and internal post-filter), we recommend to never set this number below 2.
Index prefix
You can override the index prefix used. It is not necessary to assign a different one for every language or store you have.
thirty bees will automatically attach those numbers, meaning that if your basic prefix is thirtybees, for a shop with ID = 2 and language with ID = 1 it will automatically index at thirtybees_2_1.
This feature is useful if you run multiple instances of thirty bees on the same host that are not part of the same multistore instance.
Stop words
For every language you can configure the stop words used by Elasticsearch. This is updated on every full reindex of Elasticsearch (click Erase index first).
You can extend or replace the default libraries used by Elasticsearch. I.e., the code _english_ refers to the default list of stop words for English.
Enable logging
Beta 2 remark: This option was supposed to provide more logging capabilities. As of beta 2 this feature does nothing and might get removed in a future release.
Connection
The connections tab allows you to configure the connection with the Elasticsearch server. This module also supports clusters (from both the frontend and backend). From both the backend and frontend it uses round-robin for load-balancing.
Ajax proxy
The proxy button proxies all the servers to your frontend via the module's endpoint (/module/elasticsearch/proxy by default), otherwise the frontend search is sent to your servers directly.
Servers
If you want to update the URLs, for example with the read-only URLs based on the the .htpasswd username/password combo you configured, you can update them on the Connections tab. Example of a configuration:
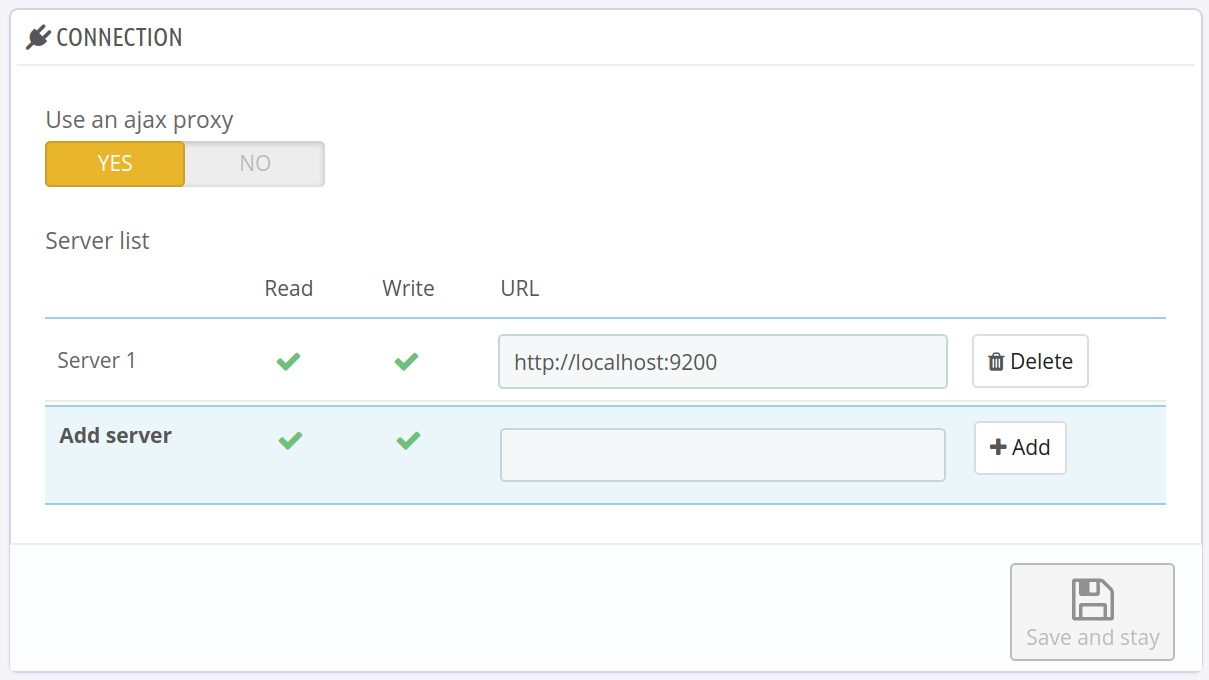
The write and read setting tell the module which servers should be used for read operations and which should be used with write permissions. DO NOT MIX THE TWO: when a server/URL has write permission, DO NOT add the read permission!
Indexing
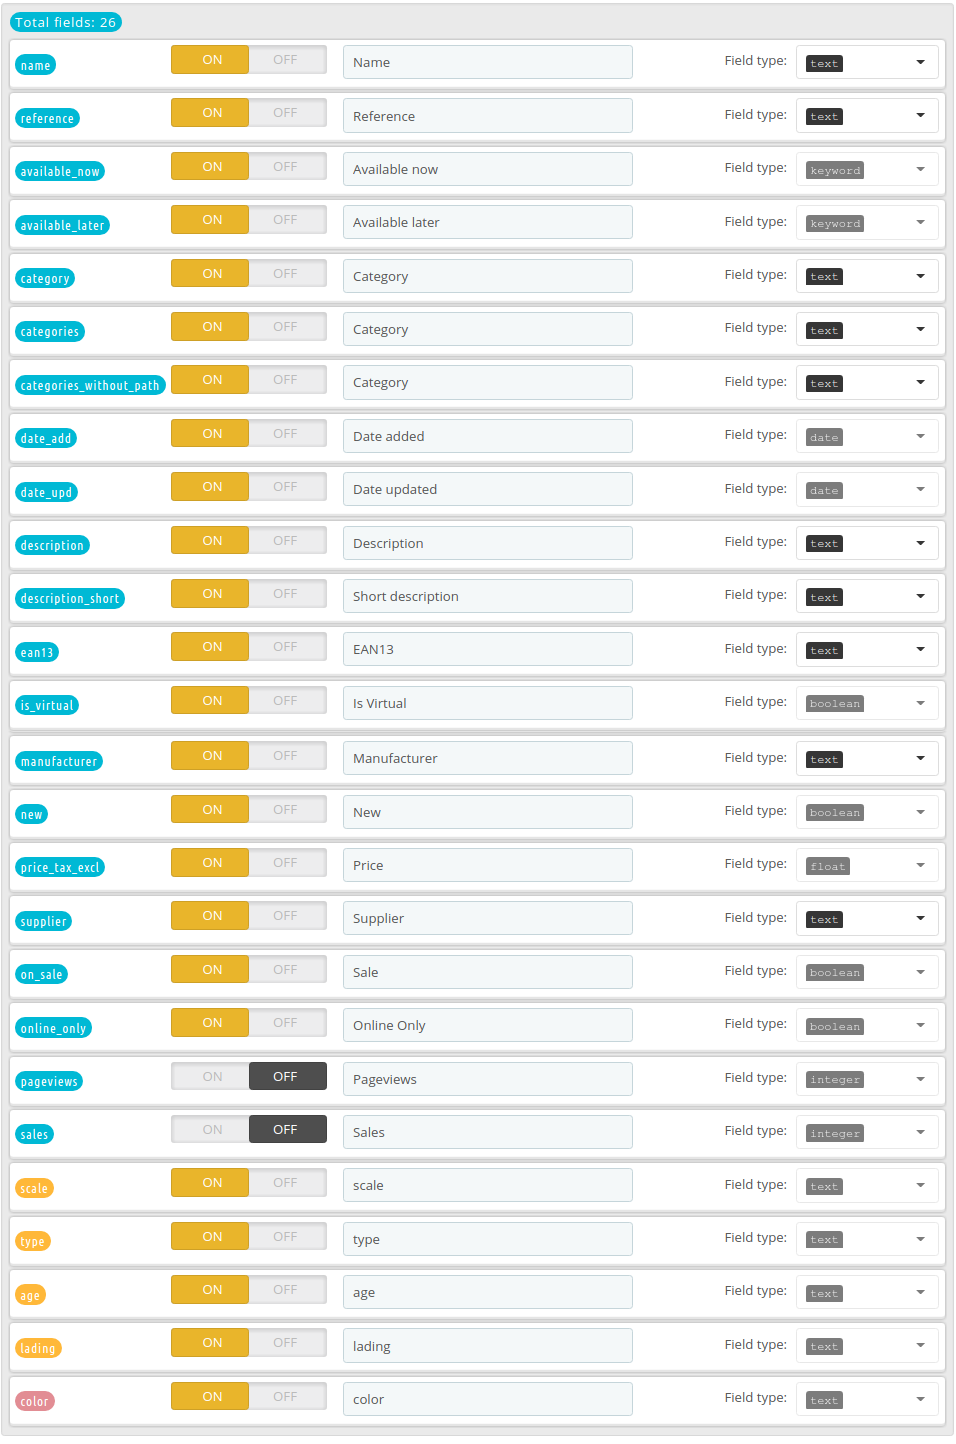
This section allows you to configure how the module indexes your products.
Note that there is a limitation on the features and attributes that can be indexed. If you have a feature or attribute that after running it through
Tools::rewrite(URL rewriting) generates the same code as an already existing property, feature or attribute it will be ignored by thirty bees, since every single code has to be unique because of the way this module was built. For example, the data structures used by this module and direct URLs to searches all require unique codes. If you want to avoid collissions, make sure you rename your feature or attribute so it becomes visible and can be used by the moduleBeta 2 note: This limitation is probably the number one cause why the module does not index your products. If you cannot index your products, start searching for duplicates! We will improve error reporting with subsequent updates to make this process easier.
The module comes with a few default settings already prepared for optimal results. In case you need an example, this is what has been configured for a miniature car store:
Search
On this tab you can select which fields should be used for search (YES / NO). Note that all these fields need to have the data type text if you are using fuzzy search, otherwise you can use both text and keyword.
It will generally be hard to use this this with other fields, so if Elasticsearch generates errors after changing this setting double-check if your fields all support search.
To make the search as solid as possible, sometimes the module decides to silently ignore fields. For instance, if you have configured reference to become a long (number) and you enable fuzzy search, then the module knows that his will not work with Elasticsearch and will not request the Elasticsearch server to use this field for search.
By default search suggestions (the autocomplete dropdown beneath the search bar) are sorted by relevance. Elasticsearch has a smart scoring system that determines which results are more important. The raw query editor on this search page will allow you to even further optimize this, but do note that the weights are very important. Choose them wisely. More information on the scoring system of Elasticsearch can be found on this page.
An example for the miniature car store:

You can further tweak the raw search query. Do note that the placeholders ||QUERY|| and ||FIELDS|| will always have to be added, so if you want to adjust the query, find a way to place these essential variables first.
The default query can be found in the file /modules/elasticsearch/data/defaultquery.json:
{
  "bool": {
    "must": [
      {
        "multi_match": {
          "query": ||QUERY||,
          "fields": ||FIELDS||,
          "type": "best_fields",
          "operator": "OR",
          "fuzziness": "auto"
        }
      }
    ]
  }
}
Be aware that this file does not contain valid JSON, but rather is a template for the module to use. The default one is suitable for most cases. The module shows what the placeholders will be replaced with:
||QUERY||will be replaced with a string containing the search query:"search"||FIELDS||will be replaced with the selected fields and their weights in an array, i.e.:["name^4", "description_short^2"]
Filter
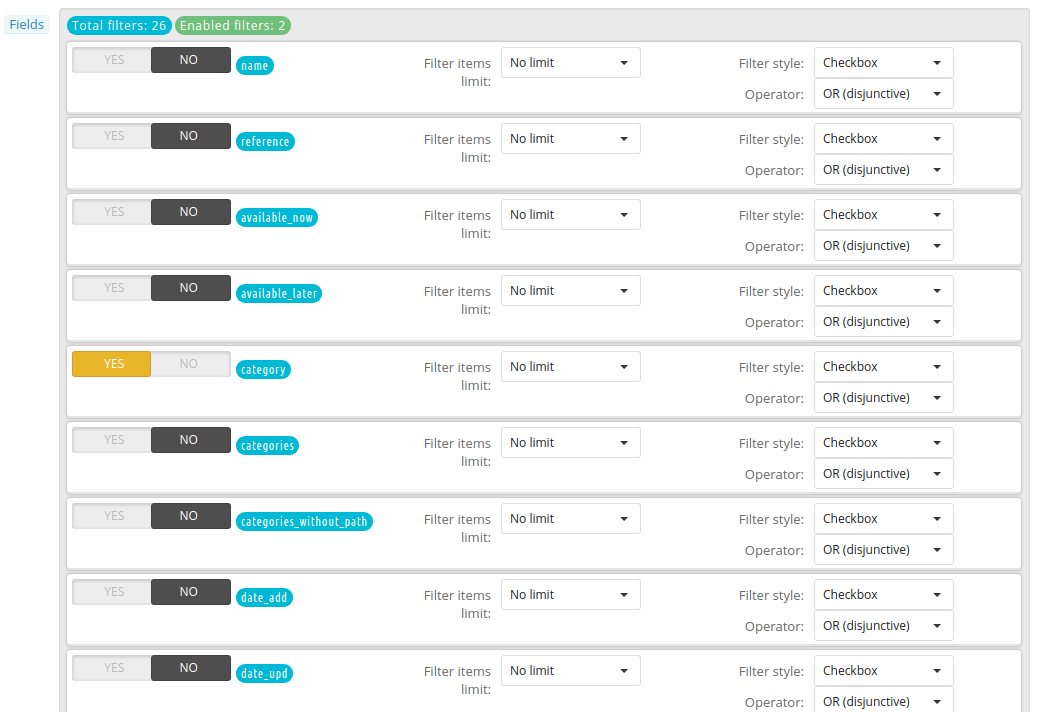
Since this module provides faceted search you can also configure the facets or filters used on this page. Depending on the data type this page presents you with several configuration options.
You can enable/disable a filter with the YES/NO toggle. By default all filters are shown in a scrollable facet, meaning a scrollbar will show when there are a lot of options to choose from. By default Elasticsearch returns an estimate of the amount of products that belong to a filter and not always all filters are shown. This is due to performance reasons and often the case if you have to show thousands of filters. If you have a facet type that can return thousands of filters, then it is recommended to limit the amount of results shown seen the fact that a human brain cannot process that much information at once. Don't overwhelm your visitor!
As of beta 2 there are several filter styles available:
- Checkbox: the most common one, a simple checkbox
- Slider: A range slider, which is especially useful for prices
- Color: Shows a color checkbox, can only be used with color attributes
A filter can be either conjunctive (AND) or disjunctive (OR). If you want the visitor to select multiple values, you can use a disjunctive filter.
Every filter can be dragged and dropped on the Indexing, Search and Filter page. This changes the filter's position on the result columns on the front office when searching.
An example from the model car store:
Display
This section is used to configure what features are activated and how they are displayed on the front office.
Use a list as default product layout
By default, the first time a visitors uses the search products are shown in a grid. If the visitor prefers to show them in a list, this is then locally stored in the browser and on every subsequent search/site visit the module will always show the list instead. When you want to display a list by default to visitors, right from the start, you can enable this option.
Replace native pages
This option replaces the native category, manufacturer and supplier pages, allowing to show you the blazing fast Elasticsearch results instead of the previous old-fashioned search options.
Search in subcategories on replaced pages
By default subcategories are shown but not searched in. If you want to show results from subcategories on the category pages, be sure to enable this option.
Autocomplete
The module can show search suggestions beneath the search bar. To show the 5 most popular options while searching, enable this option.
Instant search
The option Instant search will directly replace the current page's content with instant search results. Every layout with a main column is supported.
Infinite scroll
If you would rather use infinite scroll instead of regular pagination, you can enable this option.
Price slider tax rules group
There is a limitation to which taxes can be calculated real-time for the current user. The module can only index prices for one tax rules group at a time. Therefore this option becomes important when you use a price slider. It will apply the selected tax rules group. Note that products which belong to a different tax rules group might get incorrectly shown in the search result. In order to avoid confusing your visitors it is recommended to disable price sliders if you have mixed tax rates in your store.
