Admin Area

Welcome to the backbone of your store! Now that you’ve installed ThirtyBees it is time to learn how to navigate the administration area and well as go over all the features available to you.
Note: In case you missed it before, you can access the administration area by going to yoursite.com/admin(random-characters) which should have been displayed to you during installation. If you do not remember, simply ftp into your server and check the /public_html/ or /www/httpdocs folder.
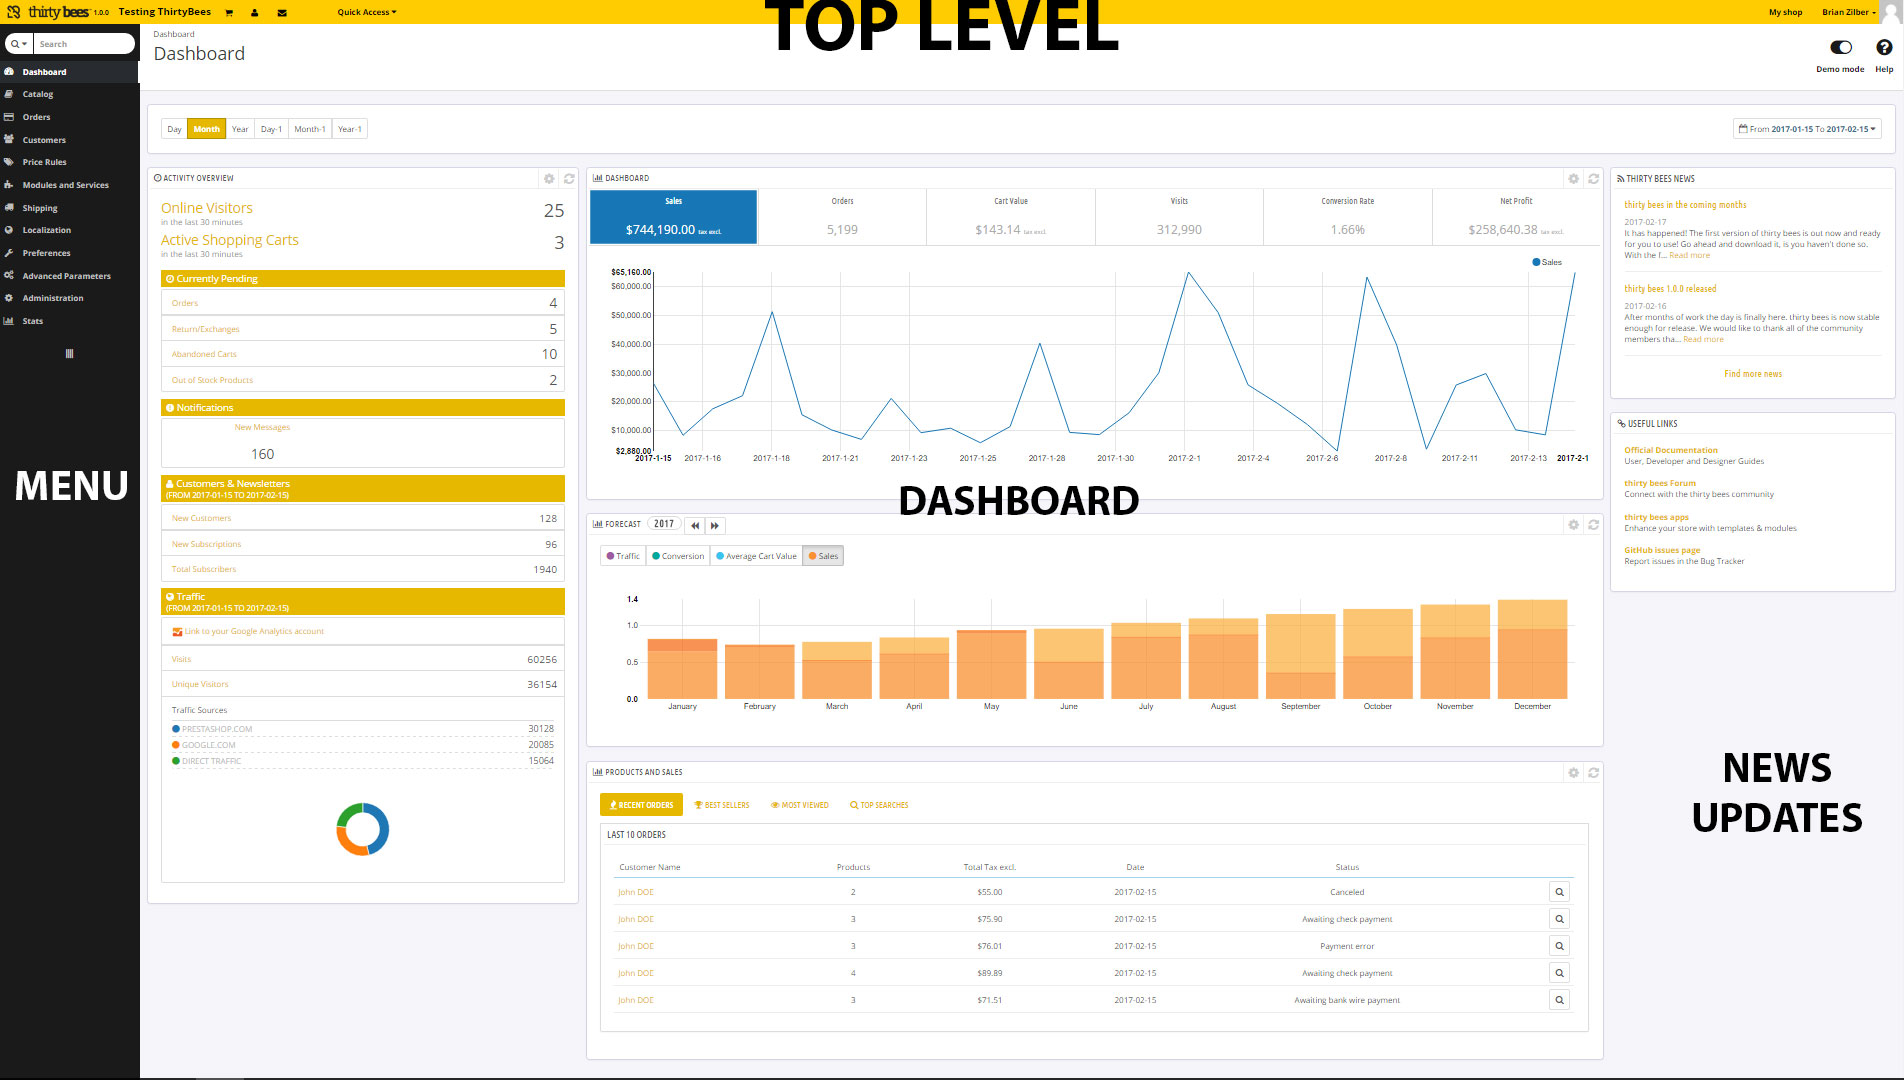
Each section of the Administration page is designed to provide you with certain information pertaining to an aspect of your store, such as quick summary, basic traffic information, current visitors, and active carts, among others.
Top Level
Lets examine all the parts of the top level in the order they appear:
- ThirtyBees Logo – Logo of the platform you are using. Version – Current version of the platform you are using. Name – The name of your store.
- Cart – Shows you the amount of orders you have received since the last time you have clicked on it.
- Figure – Shows you the number of new customers who have signed up since the last time you have clicked on it. Letter – Shows you the number of messages received from your customer or through the contact page since the last time you have clicked on it.
- Quick Access – Pages or modules you have saved. To save, go to the page or module and then hover over the quick access link, click “Add Current Page to Quick Access” to add it to your quick access menu!
- My Shop – Redirects you to the front end of you site so you can view what your customers are seeing. User Account – Settings for your account including name, email, password, language, and more.
- MENU SELECTION – Within your user account, you can select to view the main menu vertically
- (left side & default)
- vertically (top)
[Enter Pic of Vertical & Horizontal Menus]
Menu
After a while, clicking through the menus become second hand nature! Described in the order they appear. NOTE: While by default the menu is located vertically on the left side, this can be changed in your user preferences to be horizontal and/or icon only. Search Field with Drop-down List. Search anything within the context of your shop.
- Dashboard The starting point of your back office, displaying live statistics of how your business is doing with configurable modules to give you the information you need!
- Catalog The lifeblood of your store, where all your products, categories, suppliers, & manufacturers live. Orders. The pulse of your enterprise starts here! Tracks what has been paid or shipped, create a manual order, process a refund, customer service, and more! Customers. The engine that keeps you financed! Keep track of your customers.
- Price Rules Specials, Free Gifts, Coupon Codes… This is where you want to look.
- Modules and Services.
- Shipping Control your carriers, rates, and other delivery options here.
- Localization Set up your country, taxes, languages, and other settings.
- Preferences Options for setting up the default behaviors of your store and more.
- Advanced Parameters Configuration Information, Performance (Caching, media servers), Logs, DB Backups, Webservice, 1 Click Upgrade, and more.
- Administration Control you Admin notifications, employees, their permissions, admin menus, and more.
- Stats Various Statistical modules designed to give you basic information about your store, products, and customers.
- Stock Must be enabled (Advanced Stock Management) in order to be displayed. A way to keep track of your store stock in one convenient location.
- Modules and Services.
NOTE: While these are the defaults, adding modules or other services may add more options to this menu.
Dashboard
A quick snapshot of your store and its dealings!
- Date Selector Select the date range to view.
- Activity Overview Whose visiting and what is going on?
Online Visitors. Who has visited your store in the last 120 minutes.
- Active Shopping Carts Who have added an item to their cart in the last 120 minutes.
- Currently Pending Orders. Current orders which have not been shipped.
- Returns/Exchanges Current returns and exchanges which have not been processed.
- Abandoned Carts Carts which items were added to but resulted in no order.
- Out of Stock Products Products currently enabled but out of stock.
- Notifications
- New Messages Unread messages left to you by customers who have placed orders or general inquiries through contact system.
- Product Reviews Number of reviews left by customers since the last time you viewed.
- Customers & Newsletters
- New Customers The number of new customers that have signed up per the date range.
- New Subscriptions The number of new subscriptions for your newsletter.
- Total Subscribers The total number of subscriptions to your newsletter.
- Traffic
- Visits
- Unique Visitors
- Traffic Sources Approximate distribution of where your traffic is coming from.
- Dashboard Live up to date statistics about your store. Just select a date range and start analyzing!
- Sales Total sales amount.
- Orders Total amount of orders.
- Cart Value Average $ amount of items placed in cart.
- Number of Visits Total number of visitors to your store.
- Conversion Rate Of the amount of visitors you received, how many placed an order. (Depending on the industry, anything over 3% is considered good.)
- Net Profit The profit amount after deducting expenses. In order to more accurately gauge net profit, click the gear icon in the top right corner to access the settings and add other expenses you may be incurring.
- Forecast You can set goals for your shop and see how they compare to what happens. Click on the gear icon in the top right corner to fine tune your goals.
- Product and Sales A hook containing 4 useful statistic modules. Recent Orders, Best Sellers, Most Viewed Products, & Top Searched Products. Adjust the settings by clicking on the gear icon in the top right corner.
Positioning
All positions of the modules can be changed so you can have the information you need, where you need it. To do so follow these steps.
- Go to Modules & Services – Positions Page (found in the menu on the left or horizontally if so set)
- Select “Show All Modules”
Check the “Display non-positionable hooks”Checkbox
- In the “Search for a hook” field, enter “dashboardZoneOne” for the left Colum.
- In the “Search for a hook” field, enter “dashboardZoneTwo” for the right Colum.
Once you see the selected hook, you can drag the order by clicking on the modules (next to the numbers on the left) and moving them up and down.
